Log In
Training
Tutorial
Article
How to manipulate Doosan robot
Basic
30 min
In this course, you will learn about how to manipulate Doosan robot.
1. Getting Started
In order to configure an automated system with Doosan robots, it’s very important to move the robot to positions necessary to perform a task. Doosan robot provides intuitive hand guiding using precise joint torque sensors as well as jogging, which is commonly used to allow users to manipulate the robot very easily.
This course will introduce how to manipulate a Doosan robot.
2. Moving the Robot in the Jog Tab
In Jog mode, exploring the entire workspace in manual mode or exploring the user-selected operation space as the workspace is both possible. The movement angle of each axis can be limited by the robot’s specification, the operating space selected on the Jog screen and the joint angle limit in the safety settings of the Setting menu.
To use the jog function, tap the Jog button on the main menu.
- In automatic mode (during robot movement), the Jog button is disabled, so the function is unavailable.
- The robot is operated manually in the Jog screen, so the robot only moves when the Jog button is pressed.
- It is possible to move the robot based on the current position on the Jog tab screen.
- The robot can be moved by configuring the target angle/coordinate on the Move tab screen.
- It is possible to configure the reference coordinate on the Jog tab screen and Move tab screen as a joint or task.
- The robot’s alignment reference can be selected in the Settings tab screen.
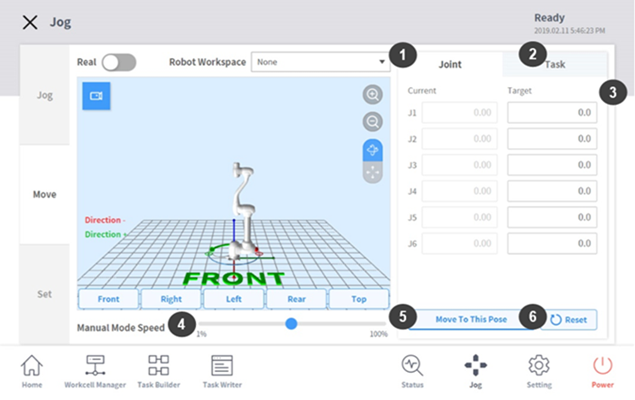
It is possible to navigate based on the current robot position on the jog screen. The image below shows a configuration of jog screen.
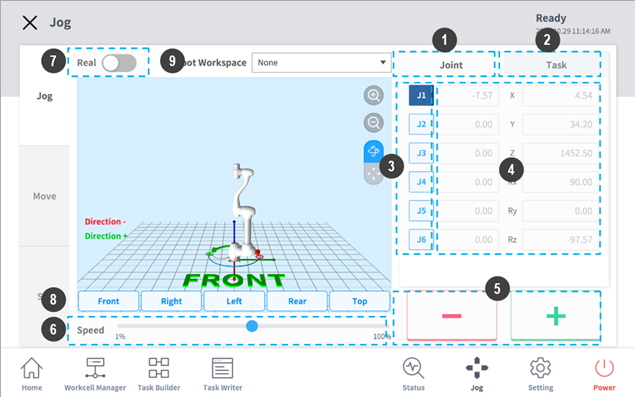
① Joint: It configures the joint as the reference coordinate for jog mode.
② Task: It configures the task as the reference coordinate for jog mode.
③ Select Axis: It selects an axis to move in jog mode.
④ Display Coordinate: It displays the coordinate of the robot currently operating in jog mode. If the robot position changes by pressing the direction button, the coordinate also changes.
⑤ Direction: It moves the robot in the + or - direction on the selected axis.
⑥ Manual Mode Speed: It configures the robot movement speed in manual mode. The speed can be adjusted by dragging the slider pointer.
⑦ Real Mode: It configures whether to operate the robot in real mode while in jog mode.
⑧ Simulator Alignment: It selects the alignment direction of the robot displayed on the simulator. Pressing each direction button aligns the robot in the corresponding direction.
⑨ Robot Workspace: It displays robot workspace information registered in the Workcell Manager in the Jog Simulator. Press the drop down menu to select the workspace to display.
※ TCP Speed Limit: The highest operation speed during jog and movement button operation is limited to 250mm/s according to safety policies.
In the Jog screen, the robot can be moved to the desired position based on the joint, base, and tool coordination.
※ If the robot stops due to reaching the joint limit or detection of collision while moving the robot with jog mode, set the safety recovery mode and move the robot to be positioned within the joint angle limit.
2.1 Jogging based on a joint
To adjust the robot’s angles on a joint basis, follow these steps:
a. Go to the Jog screen and tap the Joint tab.
b. Select the axis you want to adjust (J1 to J6).
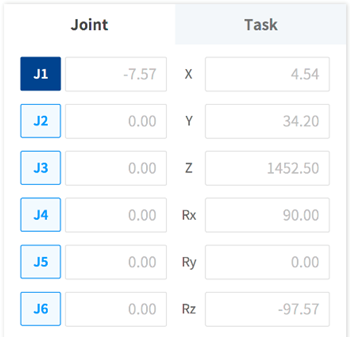
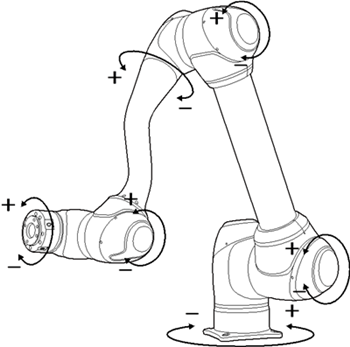
c. Adjust the angle of the axis by holding down the direction buttons (+ and -). Please refer to the image below for the rotational directions.
[Try It]
Select the J1 axis, and move the robot counter-clockwise and clockwise by holding down the + and – buttons.
2.2 Jogging based on the robot base
To move the robot based on its base, follow these steps:
a. Go to the Jog screen and tap the Task tab.
b. Set Base as the reference point for the task coordinate system.
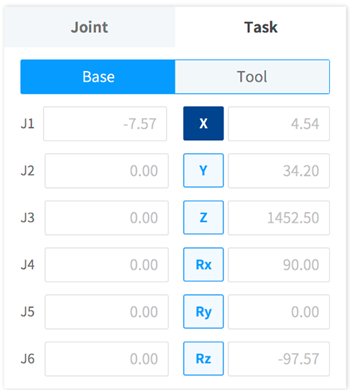
c. Select the base coordinate system you want to move.
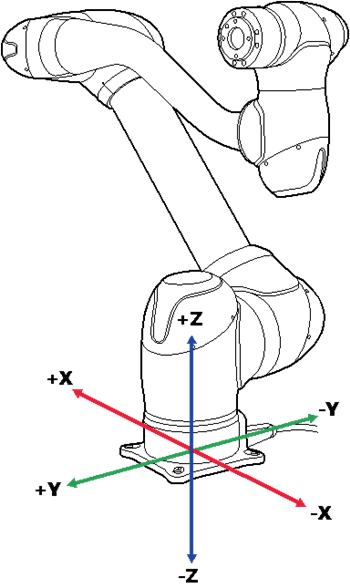
d. Move your desired axis by holding down the direction buttons (+ and -). Please refer to the image below for the directions.
[Try It]
Select the Z axis and move the tool flange in the upper and lower directions by holding down the + and – buttons.
2.3 Jogging based on the tool
To move the robot based on its tool, follow these steps:
a. Go to the Jog screen and tap the Task tab.
b. Set Tool as the reference point for the task coordinate system.
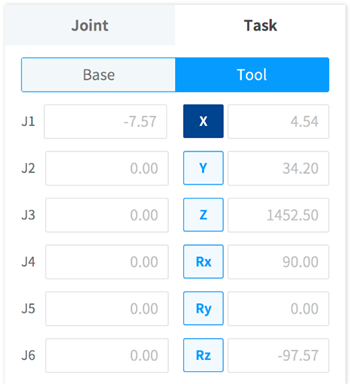
c. Select the tool coordinate system you want to move.
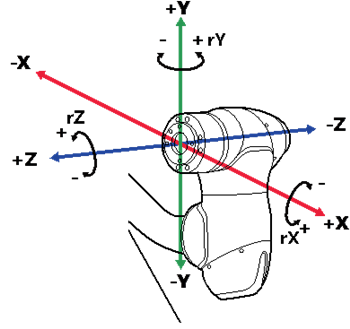
d. Move your desired axis by holding down the direction buttons (+ and -).
[Try It]
Select the Z axis and move the tool flange forward and backward by holding down the + and – buttons.
3. Moving the Robot in the Move Tab
The robot can be moved with a target angle/coordinate in the Move tab. If you know the coordinate of the robot’s destination beforehand or need precise movement in decimal points, insert the appropriate coordinate for movement.
① Joint: It configures the reference coordinate to use when moving the robot with a jog.
② Task: It configures the reference angle to use when moving the robot with a jog.
③ Reference Point Setting: It configures the reference point to align the task coordinate.
④ Manual Mode Speed: It configures the robot movement speed in manual mode. The speed can be adjusted by dragging the slider pointer.
⑤ Move to This Pose: It moves the robot to the target position while holding this button.
⑥ Reset: It updates the current position information on the screen.
※ The Move tab is similar to the Jog tab, but the difference is that the robot movement is made by entering the target position without using the + and – buttons.
3.1 Moving the robot by specifying joint angles
To move the robot based on a specific angle, follow these steps:
a. Go to the Move screen and tap the Joint tab.
b. Enter a target angle for the robot joint.
c. Turn on Real mode.
d. Adjust the robot’s angle by holding down the Move To This Pose button.
[Try It]
Press the Reset button and enter the value of the current J1 axis plus 30 degrees in the J1 axis. Then press Move to This Pose to check robot movement.
3.2 Moving the robot by specifying position values in the base.
To move the robot based on base coordinates, follow these steps:
a. Select the Move tab and select the Task tab.
b. Select the Base tab.
c. Configure the pose to move with reference to the base.
d. Tap and hold the Move To This Pose button to move to the configured coordinate.
[Try It]
Press the Reset button and move the robot by entering the value of current Z axis plus 50 mm in the Z axis. Then press the Move to This Pose button to check robot movement.
3.3 Moving the robot by specifying values in the tool reference coordinates
To move the robot based on tool coordinates, follow these steps:
a. Select the Move tab and select the Task tab.
b. Select the Tool tab.
c. Configure the pose to move with reference to the tool.
d. Tap and hold the Move To This Pose button to move to the configured coordinate.
[Try It]
Press the Reset button and move the robot by entering the value of current Z axis plus 20 mm in the tool Z axis. Then press the Move to This Pose button to check robot movement.
- When the Reset button is pressed, all values of tool reference coordinates will change to zero.
4. Aligning the Robot in the Set Tab
In the Set tab, the robot can be aligned easily.
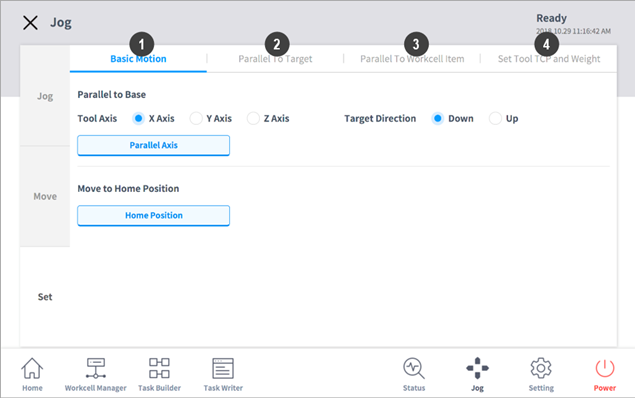
① Basic motion: Aligns the robot’s TCP based on the base axis and target direction.
② Align to target object: Aligns the robot’s TCP based on the target object.
③ Align to workcell item: Aligns the robot’s TCP based on the workcell item.
④ Tool center position and weight: Sets the robot’s TCP and weight.
In this section, let's take a look at the basic motion tab features that are often used in programming robots.
4.1 Aligning the robot based on the base axis
When the work item is positioned on the axis direction of the robot base, it is possible to align the TCP on the workpiece before workpiece teaching. As the teaching pose can be configured in line with the base coordinate axis, it is easy to specify a teaching pose. To perform teaching after locking pose, use the locked plane or line direct teaching function with Cockpit buttons.
To align the robot's TCP based on the base axis, follow these steps:
a. Go to the Set screen and select the Basic Motion tab.
b. Select your desired reference tool axis.
c. Select your target direction.
d. Align the axis by holding down the Parallel Axis button.
[Try It]
Select the Z axis of Tool Axis and the Down in Target Direction. Then, align the robot by holding down the Parallel Axis button.
4.2 Moving the robot to Home
The robot can be moved to the default home position or the user home position configured in Settings on the main menu.
a. Select the Settings tab and select the Default Motion tab.
b. Tap and hold the “Home Position” button to move the robot to home position.
[Try It]
Move the robot by holding down the Home Position button.
- Before trying this function, please check for any collision possibility in the upper area of the robot workspace.
5. Moving the Robot by Hand-Guiding Operation
The user can change the robot pose by directly moving the robot. Use the Hand-guiding button on the teach pendant or use the cockpit located on joint J6 to change the robot pose.
- Before entering the robot’s operation range, press the "Hand-guiding" button on the teach pendant one or two times to make sure that the robot does not move when no external force is applied.
- If a tool is installed on the tool flange, configure the tool weight in the Workcell Manager and Jog screens on the teach pendant before changing the robot pose. If the Hand-guiding button is pressed without configuring the tool weight, the robot may move abruptly.
5.1 Hand-Guiding button of teach pendant
The user can change the robot pose directly while holding the Hand-guiding button located on the back of the teach pendant.
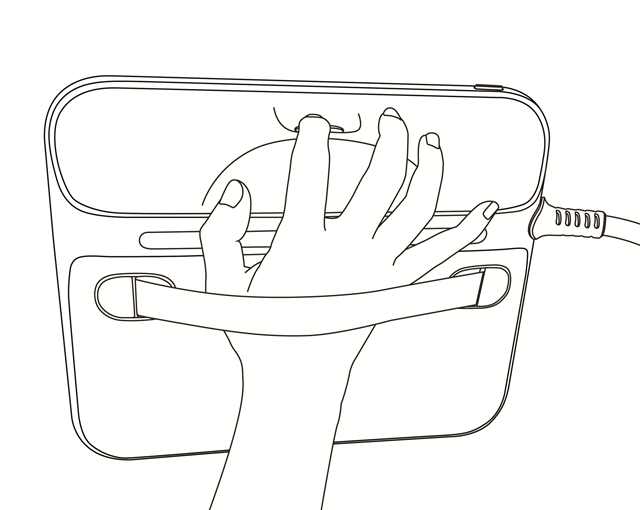
[Try It]
Move the robot freely by pressing the Hand-Guiding button on the back side of the teach pendant with one hand.
※ By default, the Hand-guiding button can only be used in Manual mode, and it cannot be used in Automatic mode when the task program of the Task Builder and Task Writer are operating. However, if the robot is set to the Hand-guiding Ready state with the Hand Guide command of the Task Writer, the button can be used even in Automatic mode.
5.2 Moving the robot using the Cockpit buttons
The user can change the robot pose while holding the Hand-guiding button or custom button on the cockpit.
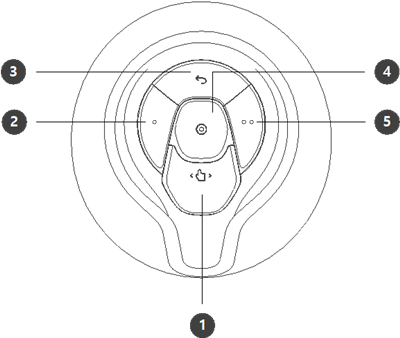
① Hand-Guiding button: Enables you to freely change the pose of the robot in any direction.
② Constraints motion button: Enables you to change the pose of the robot by entering your desired pose according to the fixed condition corresponding to its assigned mode.
③ Previous button: Deletes the latest saved position.
④ Save button: Saves the robot’s current position.
⑤ Constraints motion button: Same as button ②.
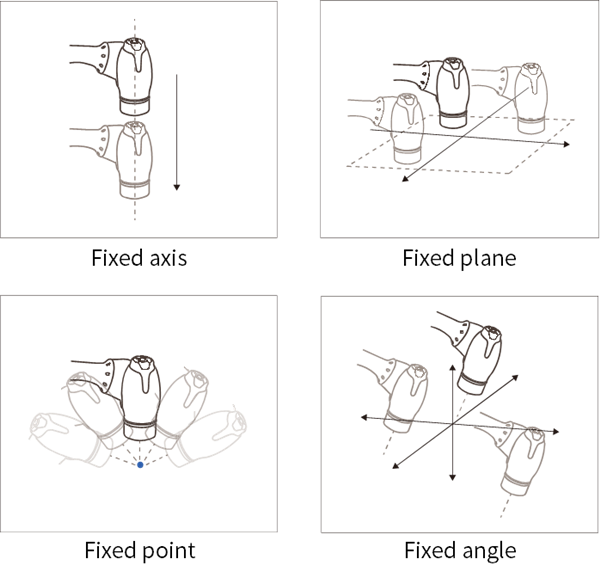
Available Hand-Guiding modes for the Constraints motion button are as below:
- Fixed axis: Changes the robot's pose along the Z axis of the tool coordinate system.
- Fixed plane: Changes the robot’s pose along the XY planes of the tool coordinate system.
- Fixed point: Changes the angle only based on the reference point in the tool coordinate system.
- Fixed angle: Fixes the current TCP angle and changes the robot's position only.
※ The pre-drive button ① and constraints motion buttons ②/⑤ settings require 0.2 seconds to be modified.
[Try It]
Move the robot freely by pressing the Cockpit buttons with one hand or two hands (for more precision).
Also, move the robot by pressing the Constraints motion buttons to experience constrained hand-guiding mode with fixed axis or plane. .
6. Summary
In this course, jogging and Hand-Guiding functions were introduced. In the Jog tab, the robot can be moved to a necessary position or aligned on a certain basis. By using the Hand-Guiding function, the user can move the robot freely with one hand or two hands.
Please refer to the user manual for more detailed information.
7. Recommended Resources
- Doosan Robotics User Manual, https://robotlab.doosanrobotics.com
※ Doosan Robotics has copyright and intellectual property rights to all content and all designs shown in this contents. Therefore, any use, copying, or dissemination of them without written permission from Doosan Robotics is prohibited. Please note that you will be held solely responsible for any improper use or alteration of the patent rights of Doosan Robotics.
Recommended Training Class
These learning opportunities can help you get started quickly.
Article
Programming with the robot’s PROFINET IO Device Function
Article
How to program with EtherNet/IP
Article
How to program using TCP/IP Socket