Log In
Training
Tutorial
Article
Task Builder (Advanced): Pick & Insert
Basic
30 min
In this lesson, you will be introduced to ‘Pick & Insert’ with Task builder.
1. Getting started
Using the skill and advanced control of the task builder provided by Doosan Robotics, Peg-in-holes that insert other parts into base parts can be programed. Pak-in-Hole works by detecting the contact while approaching of the workpiece near the hall and then finding and inserting the hole through spiral motion.
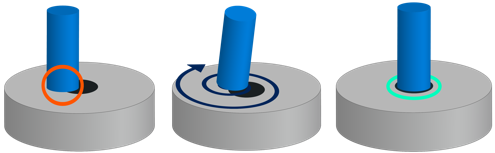
In this lesson, we will use program with spiral motion command and compliance/force control function.
2. Pick & Insert Skill overview
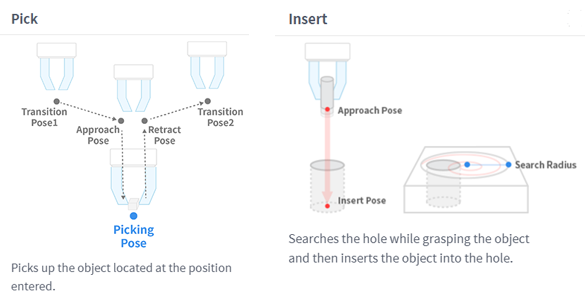
To use the Pick & Insert skill, you must first set the end effector and tool weights in the ‘Workcell Manager’. Then, select the gripper and tool weight you set from the ‘Workcell Item’ when you create a new task. By selecting the ‘Pick and Insert’ skills in the ‘Commands’ tab of the task list, you can easily program from approach/retraction settings to compliance control, contact detection, and spiral/rotation search settings.
In this lesson, we will use various ‘Task builder’ commands and ‘Grasp & Release’ skill. Below are necessary commands for the task.
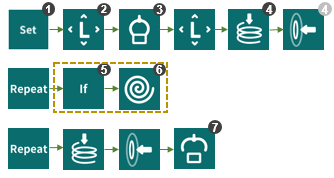
① Set: Setting for Gripper weight, TCP, and etc.
② Move L: Setting for approach/retraction distance and moving speed.
③ Grasp: Grasp action
④ Compliance & Force: Compliance & Force control
⑤ If: conditional statement
⑥ Move Spiral: Spiral motion setting
⑦ Release: Release action
After contact detection in pack-in-hole task, it is necessary to define the compliance/force control settings, if statement, and condition for ‘repeat’ command to find a hole through spiral motion. More details can be found in the following programming method.
3. How to program ‘Pick & Insert‘
For effective explanation of compliance control, we will program ‘Pick & insert’ with spiral motion and compliance control. Please refer to the video clip below.
To effectively illustrate how to use compliance control, we will do pick and insert programming with compliance control, force control, and spiral motion. You can see an example motion from the video below.
- Reference: https://www.youtube.com/watch?v=mLOqISH_vFs
3.1 Approach/Move/Retraction setting
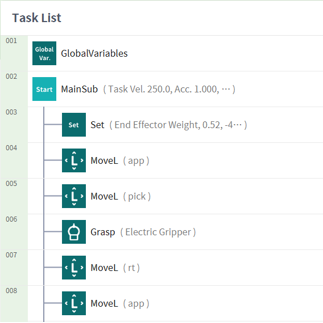
Use the ‘Set’ command to set the output signal, tool weight, TCP, and reference coordinate system to the task list. You can also program approach/move/retract and grasp using the ‘Move L’ command and ‘Grasp’ skills.
3.2 Compliance control and spiral motion setting
Using commands for Compliance, Force, Repeat, and Move Spiral, the work piece can be inserted into the hole through spiral motion when the work piece reaches the hole.
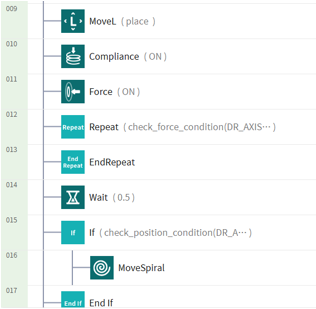
First, add the ‘Compliance’, ‘Force’ commands. Select the ‘ON’. Set the stiffness and direction of the force and press the ‘OK’ button.
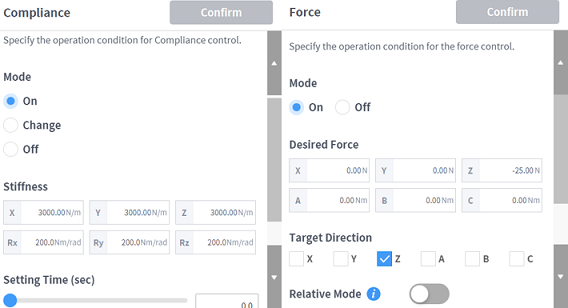
※ Stiffness range of each axis are X, Y, Z = 0~20,000 N/m, Rx, Ry, Rz = 0~400 N/m.
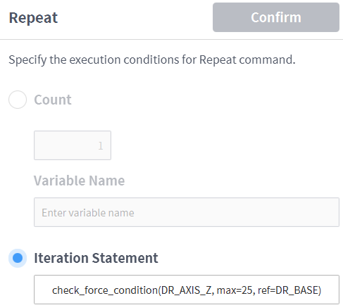
Add a ‘Repeat’ command and set the repeat condition. Motion will continued until it reaches the maximum force of 20 N according to basic coordinate of the BASE.
- Repeat condition: check_force_condition(DR_AXIS_Z, max=20, ref=DR_BASE)
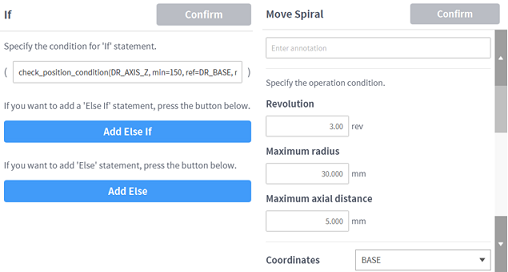
Add the ‘If’ and ‘Move Spiral’ commands. According to BASE Coordinate system, it moves at least 150 mm in the Z axis direction and increases by a constant value in a spiral path.
- If statement: check_position_condition(DR_AXIS_Z, min=150, ref=DR_BASE)
Lastly, add ‘Repeat’ command and set the repeat condition. It will continue until it reaches 0.5 N/m in z-axis direction.
- Iteration Statement: check_force_condition(DR_AXIS_Z, min=0.5, ref=DR_BASE)

3.3 Compliance/Force control and Ending the task
Add ‘Compliance’, ‘Force’ commands and select ‘Off’. Place the work piece with ‘Release’ skill and retract by ‘Move L’
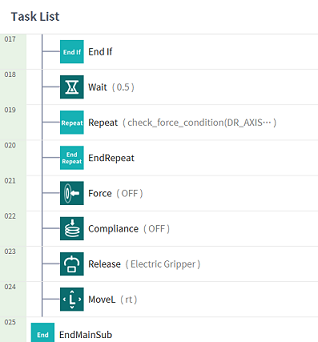
While retracting, ‘relative move’ can expedite the programing and you just have to enter the distance in Z-axis direction.
4. Summary
In this lesson, you learned how to program ‘Pick & Insert’ using ‘Task Builder’. Based on the Grasp/Release action, you can perform various tasks in addition to ‘Pick & Insert’ by using the compliance control that performs motion while absorbing external shocks when inserting the work piece into the hole. See the Reference & Programming Manual for more details.
References
- Doosan Robotics Reference & Programming Manual, https://robotlab.doosanrobotics.com
※ Doosan Robotics has copyright and intellectual property rights to all content and all designs shown in this material. Therefore, any use, copying, or dissemination of them without written permission from Doosan Robotics is prohibited. Please note that you will be held solely responsible for any improper use or alteration of the patent rights of Doosan Robotics.
Recommended Training Class
These learning opportunities can help you get started quickly.
Article
Programming with the robot’s PROFINET IO Device Function
Article
How to program with EtherNet/IP
Article
How to program using TCP/IP Socket