1. Getting Started
Automation designing with a collaborative robot requires configuration of robot operation along with the basic setting and functions covered previously. This process can be referred to as robot programming or task programming, and Doosan Robotics provides two methods for programing.
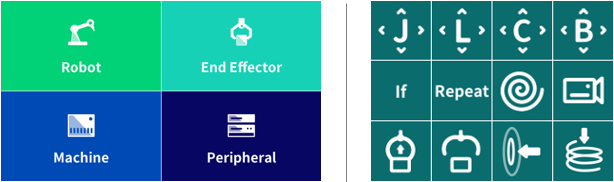
- Task Builder: Provides an intuitive and easy programing environment with ‘Icon’ based ‘skills’ on operation of robot and its peripherals.
- Task Writer: Provides various commands related to robot operation and enables sophisticated/diverse task programing.
In this course, we will learn how to program using the ‘Workcell Manager’ and ‘Task Builder’ provided by Doosan Robotics.
‘Workcell Manager’ is a kind of peripheral setup menu. Here you can add apps for setting up connection for Doosan robots (smart setup, safety settings and etc.) as well as end effectors, machines, and peripherals that are essential for robot automation.
‘Task Builder’ can program robot tasks with unique icon based command provided by Doosan Robotics called ‘skill’. In addition to basic robot operation skills such as ‘Move J’ and ‘Move L’, it can be easily program the task using pre-defined skilled accordant to attached peripherals set up in ‘Workcell Manager’.
2. Workcell Manager
In general, the interlocking of robots and peripherals can be done by digital or analog signals or industrial communication. However, in order to interlock, the user must learn how to program the signals and the related commands provided by the robot. ‘Workcell Manager’ provides a smartphone-like user interface to alleviate this learning challenge. Therefore, the user can easily add an app for connecting the robot and peripherals through the setting screen of the ‘Workcell Manager’, without having to study the commands necessary for communicating with the peripherals in advance.
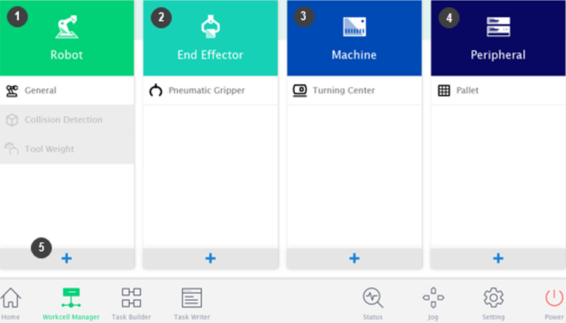
2.1 Main Screen of ‘Workcell Manager’
① Robot: You can add environment setting items such as installation pose, tool weight, working space and collision detection invalid area. For more information, please refer to the online training course, “How to use Smart Setup (automatic measurement)”.
② End effector: You can add gripper, screwdriver and many other tools.
③ Machine: Press machine, Turning center, Injection machine and many other task machines can be added.
④ Peripheral Devices: You can connect devices such as pallet patterns, air blowers, and conveyors.
⑤ ‘Add’ button: Add selectable items to each items.
※ A deactivated Workcell item can be activated / deactivated by clicking the icon and then using the toggle button. You can add multiple items and activate and select the required items
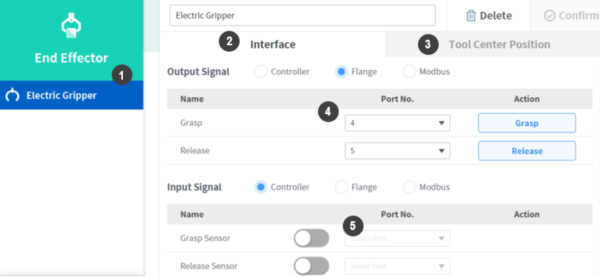
2.2 Setting up end effectors
End effector setup is consist of two parts. First is a communication center tab for robot and the end effector. The second is a tool center position tab.
In the Communication tab, enter the necessary signal or communication settings for interfacing the robot with the end effector using digital signals or Modbus-TCP.
① End effector includes pneumatic, vacuum, digital gripper, screwdriver, gluing tool, deburring tool, polish, and air blow nozzle. It also provides setting function to register other user tools.
② Set I / O signal.
③ Set the tool center position (TCP).
④ You can select the output port and test the output signal.
⑤ You can select the output signal port and check the input signal status. Green color will be displayed to indicate normal condition.
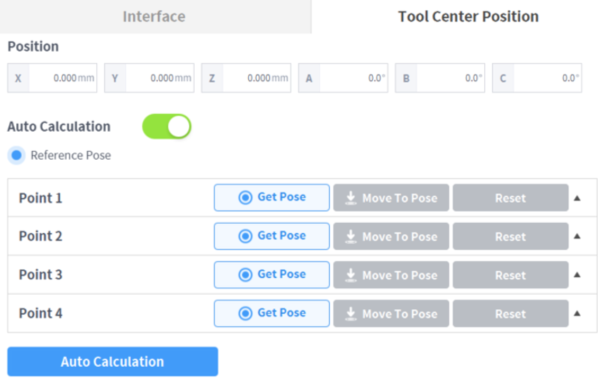
The Tool Center Position tab defines the reference point (center position) for the user-installed end effector and it is not the center point of the robot's flange.
When setting the tool center position, you must define the rotation angle along with the position in relation to the flange coordinate system.
Please follow the instructions below to set the tool center position.
- The distance cannot be set over 500mm in each direction from the flange reference origin to TCP. The rotation angles A, B, and C must be entered by the user.
- In case of the symmetric double gripper, set the TCP position base on the other already well setup end effector. You can easily set the TCP position of the new end effector by rotating the TCP position and posture of the reference end effector's tool coordinate system by the input angle around the Z axis of the tool.
[Example]
1) Add the end effector app you want to use.
A. Most of the standard pneumatic, electric and vacuum grippers are available with basic apps.
B. If you want to use the product of a specific partner registered in Doosan Mate, click Update Robot on the setting menu at the bottom right of the home screen, and click the Install button in the Workcell and Skill item to add the gripper's app installation file. Please find (* .dr3) and install it.
2) After that, press the add button in the end effector menu to set the input / output signal, tool center position, etc. and test the operation.
※ Please refer to the user & reference manual for detailed setting method of end effector, input / output signal and tool center position.
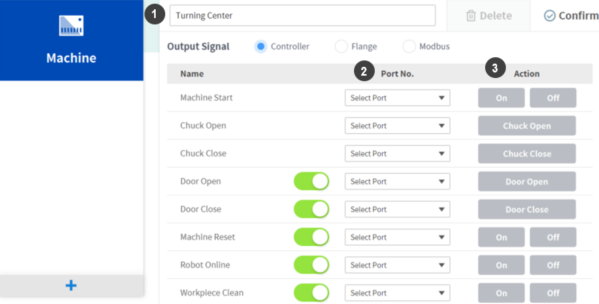
2.3 Work-Machine set up
① Please find below types of Work-Machine that can be registered in the Workcell manager.
- Turning center: equipment for cutting input shape by turret tool while rotating cylindrical work piece
- Press machine: A device that presses flat materials into a desired shape
- Injection molding machine: Equipment to inject plastic and other materials into mold
② Set output/input signal similarly to end effector.
③ Operating test for checking
※ Please refer to the User & Reference Manual for detailed description of each machine type and task item.
2.4 Peripheral set up
Peripherals are not classified as robots, end effectors, or work machines, but are Workcell items that interact with robots. Peripheral devices that can be registered to ‘Workcell Manager’ are as follows.
- Encoder: A converter that converts a signal of one code sequence into a signal of another code sequence in a digital circuit. Usually required on conveyer tracking application
- Feeder: Shooting bolts or pick-up bolt feeders. Bolt supply device when assembling screws, and various pallets for placing objects.
- Vision: A device that corrects the position of an object through image information.
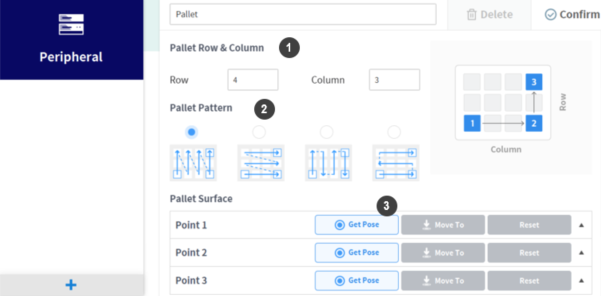
[Example]
1) Enter palette rows and columns.
2) Set the palette pattern. Move the robot TCP to position 1 of the pattern guide on the right.
3) Input the position coordinate value corresponding to the save position at point 1. Move the robot TCP to position 2 and 3 of the pattern guide and save the position respectively.
※ It is recommended to teach the three positions counterclockwise according to the guide picture of the Workcell item in order to automatically calculate the offset direction for the position where the stacked or stacked object is picked up and moved to the pallet up / down direction.
3. Task Builder
Task Builder is an easy-to-use programming tool that allows you to use auto-recommended icon-based skills and task templates based on registered work environment and peripheral information.
- Detailed list of skills, commands, and templates can be found in the separate reference manual.
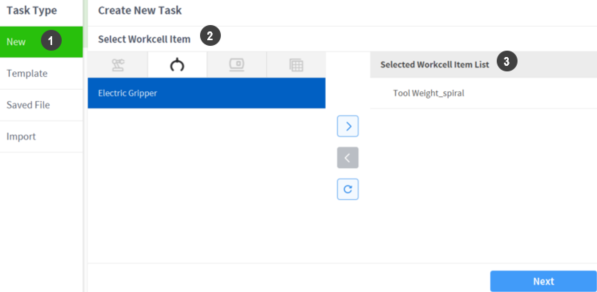
3.1 Create a task
On the initial screen of task builder, click the ‘New tab’, select the relevant Workcell items, and click ‘Next’. The task list is created as shown below.
①Task type is as follows
- New: Create a new task and save the task name.
- Template: A collection of skills consisting of a work procedure that can be used as a combination of registered Workcell items. You don't have to worry about work processes, and you can easily create tasks with setting values for the skills that are already configured.
- Saved file: You can load a previously saved file.
- Import: You can import a saved task file on an external storage device.
(The following features are only supported when the software version is M2.4.0 or later.)
② Select Workcell Item: You can select the Workcell items set up in the ‘Workcell Manager’ by category.
③ Selected Workcell Item List: It shows the current status of list items to be create for the task. You can load the previously saved file.
※ File extension of saved task file is '.tb'.
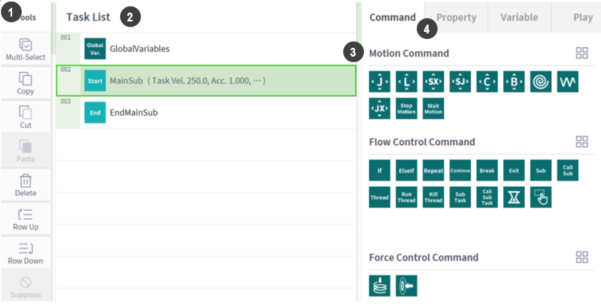
3.2 Command set up
① Tool: You can set commands in various types.
② Task List: Displays the command list added in the Task Sequence and Commands tab.
- Global / Variables: You can enter variables and poses for the task program in the 'Global Properties’ tab. Preset global variables and global poses are available on the properties screen of the command which added to the task list.
- MainSub: Selected command is added to the bottom of MainSub and executed sequentially. In here you can set global speed and acceleration.
③ Motion Commands: In addition to motion, flow and force control commands, you can select commands of the selected Workcell item commands (Ex. grippers, vision, etc.).
④ Property: You can set individual property values of each motion command. You can use variables, poses, etc. set in Global / Variables.
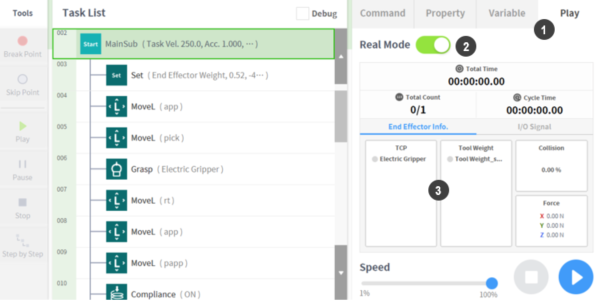
3.3 Trial (Play)
① Select the 'Play’ tab on the top right. Upon completion of the screen change, the teach pendant and flange LEDs will turn white from blue.
② Upon deactivation of toggle button, it will be changed to virtual mode (simulation).
③ Under running in a ‘Real Mode’, you can check the result through actual robot movement of the created program.
4. Summary
In this lesson, we learned how to use ‘Workcell Manager’ and ‘Task Builder’ of Doosan Robotics. The ‘Workcell Manager’ is a kind of peripheral setup menu to set up interface for end effectors, work-machines, and peripherals for the robot tasks. And ‘Task Builder’ can complete work program quickly and easily by using various skills that support pre-programed peripherals in ‘Workcell Manager’.
References
※ The copyright and intellectual property rights of all contents and designs of this document belongs to Doosan Robotics. Therefore, any use, copying or dissemination without the written permission of Doosan Robotics is prohibited. You are also solely responsible for any misuse or alteration of your patent rights.