1. Getting Started
In factory automation, the communication method for connecting heterogeneous equipment, including robots, is called an industrial communication protocol. If an absolute standard like USB exists or the system consists of devices from the same company, there is no problem. However, it is not easy to use a single communication protocol for a variety of devices and environments that have been deployed over time.
Recently, industrial Ethernet protocols have been developed and used more widely than traditional fieldbuses. Typical communication protocols include EtherCAT, EtherNet/IP, PROFINET, POWERLINK, SERCOS III, CC-Link IE, and Modbus-TCP.
In this course, you will learn how to use Modbus-TCP functions provided by Doosan robot.
2. Introduction to Modbus-TCP
Modbus is a serial communication protocol (RS-232 and RS-485) for PLC (Programmable Logic Controller) proposed by Modicon (now Schneider Electric) in 1979. Because it is simple, reliable, and free to use as an open protocol, it’s now extended to implement not only serial communications but also TCP/IP and UDP.
This protocol can be configured as a master and slave structure to monitor multiple devices and supports RTU (Remote Terminal Unit), ASCII, and TCP communication. Modbus-TCP refers to the communication protocol using TCP from Modbus technologies.
3. Functions of Modbus-TCP
The Modbus-TCP of Doosan robot supports Master and Slave functions, and it can be used for data transmission through I/O expansion or direct connection with other devices.
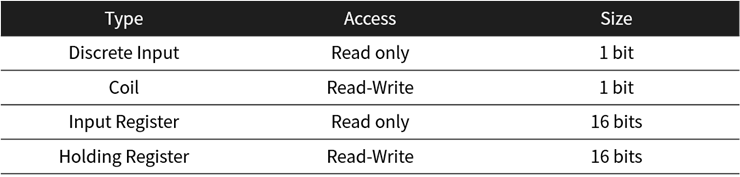
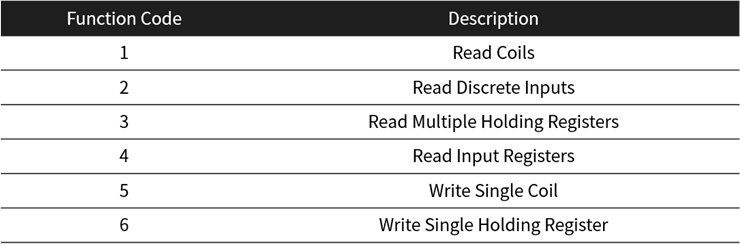
Signal types and function codes provided by Doosan Robotics are as below:
<Signal Type>
<Function Code>
4. Configuration of Modbus-TCP
4.1 Network Setup
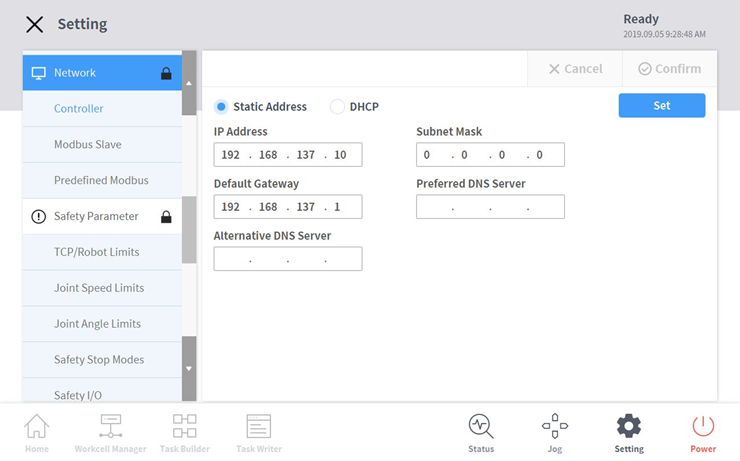
- IP of control box: The IP address for the control box can be modified in the Setting – Network menu of the teach pendant.
- IP of Slave equipment: The IP address of the Slave equipment needs to be set as the same band of the robot control box.
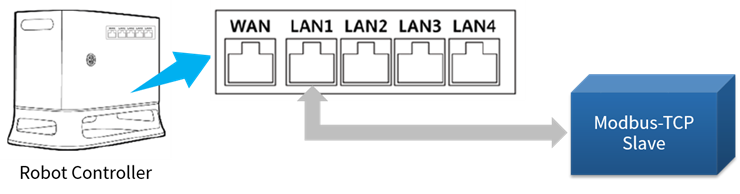
- HW connection: The physical wiring between the robot (Master) and target device (Slave) needs to be established by connecting an Ethernet cable to the LAN port of the robot controller.
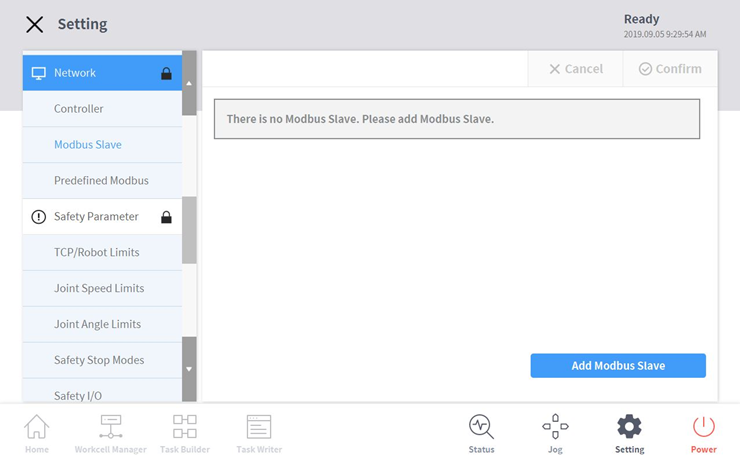
4.2 Slave setting
- Go to Setting – Modbus Slave to register a new Slave device.
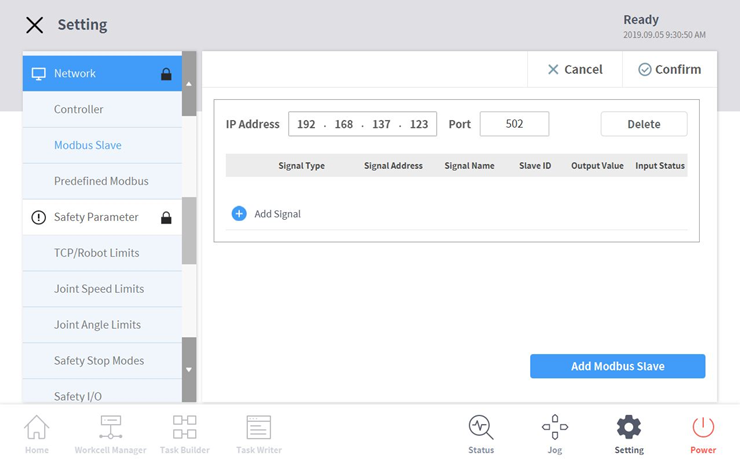
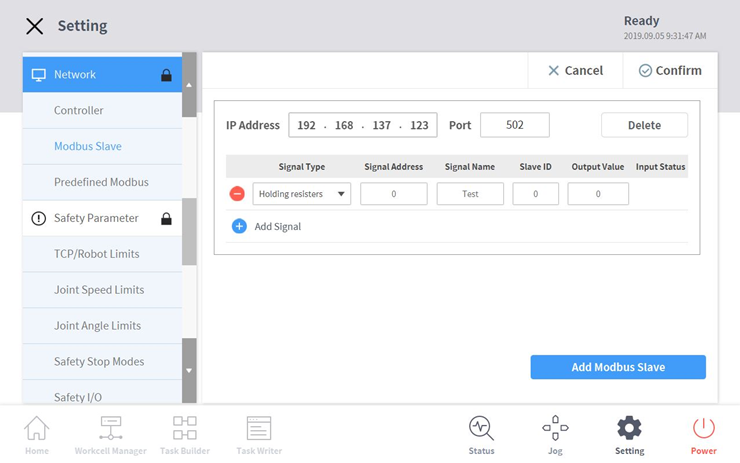
- Use the Add Modbus Slave button to register a new Slave device. You can add multiple devices if needed
- Enter the IP address and port number of the Slave equipment. Then, tap the Add Signal button and configure the detailed parameters of what you need to use, including signal type, signal address, signal name, and so on. The registered information will be used to check and modify the value of the registered signal. To save the input information, tap the Confirm button.
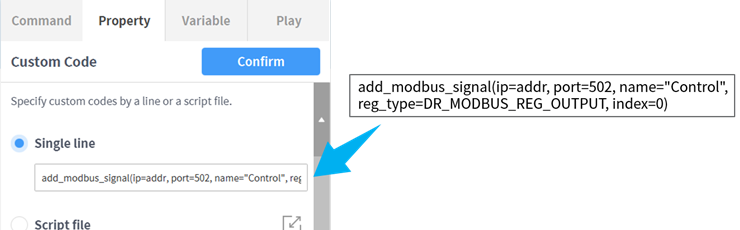
- Add a signal on the Task Writer: In the Custom Code of the Task Writer, add_modbus_signal() and del_modbus_signal() functions can be used to add and delete a signal for Modbus-TCP communication. Please refer to the programming manual for more detailed instructions.
5. Programming using Modbus-TCP Functions
The programming of Modbus-TCP functions is the same for the Task Builder and Task Writer and similar to using input/output functions.
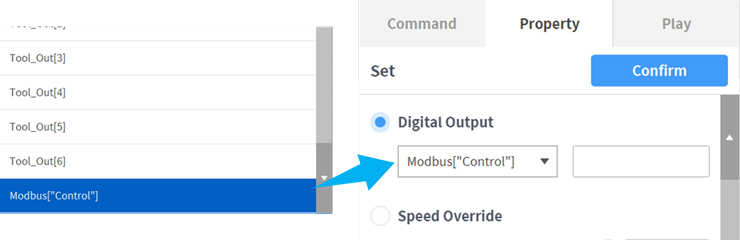
- Use the Set command to change a signal value of the Modbus-TCP digital output.
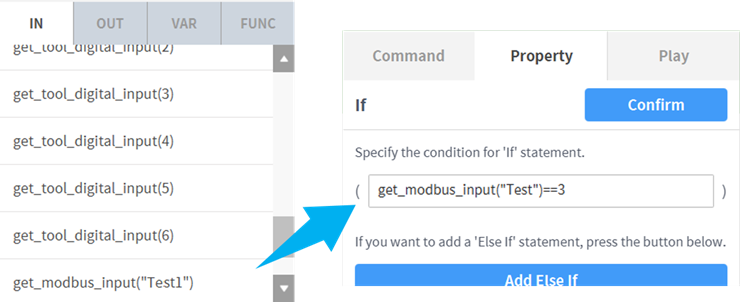
- The registered signal can be used as a variable in the If statement by adding the get_modbus_input() function.
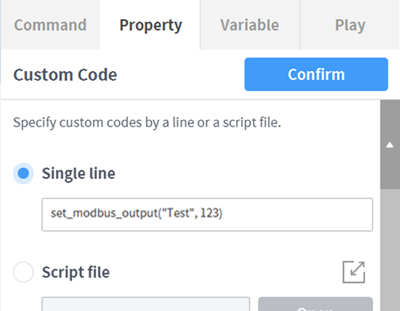
- Also, you can make a DRL (Doosan Robot Language) script with the Custom Code command.
6. Programming Exercise of Modbus-TCP functions
In this exercise, you will learn how to make a program that consists of a robot (Master) and a computer (Slave) and can show a change of robot movements using Modbus-TCP communication.
6.1 Setting a Slave equipment
The IP configuration needs to be set as the same band as the controller of the robot. Then, execute a Modbus-TCP Slave simulator on the computer.
- For Modbus-TCP Slave simulator, you can use an open source or shareware from the web.
6.2 Programming a robot task
- Create a task in the Task Builder and enter commands as below:
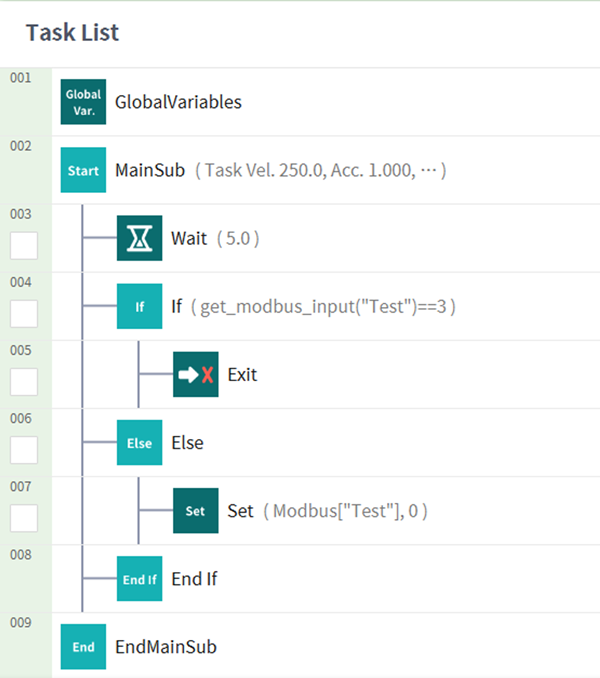
- To check the value of the ‘Test’ signals consistently while running the robot task, set the Repeat option to 100 in the MainSub block.
- The Wait command is used to pause the robot task while waiting for the Slave computer to change the registered value.
- The If statement uses the get_modbus_input() function to compare the value of the ‘Test’ signal to the value of 3. If the ‘Test’ value is the same as 3, the Exit command will be executed to stop the robot task. Otherwise, the ‘Test’ value is reset to 0 to repeat.
6.3 Test of Modbus-TCP functions
If the robot task is running and you change the register address value of 0 (same condition as the Slave signal added to the robot) to 3 during the Wait command, the robot task will execute the Exit function through the If statement. Otherwise, the signal value is reset to 0 and the robot task will repeat itself, as set in the MainSub block.
7. Summary
In this course, the configuration and programming of Modbus-TCP functions were introduced.
You can integrate various items such as grippers, machine tools with Doosan robots in the robotics automation using Modbus-TCP functions. To configure a Modbus-TCP communication structure with robots and external equipment, users need to know not only the functions of Doosan robot but also the specifications of the target equipment. Please refer to the programming manual of Doosan robot and the target equipment to integrate them into an automation system.
8. Recommended Resources
※ Doosan Robotics has copyright and intellectual property rights to all content and all designs shown in this contents. Therefore, any use, copying, or dissemination of them without written permission from Doosan Robotics is prohibited. Please note that you will be held solely responsible for any improper use or alteration of the patent rights of Doosan Robotics.